Private Drinking Water Wells
According to the State Department of Public Health, approximately 15% of the state's population is served by a private drinking water well. That's approximately 3,510,300 residents that receive their water from a private well.
In the state of Connecticut, the local health department, such as The North Central District Health Department, is the jurisdictional agency responsible for protecting and enforcing regulations with regard to private drinking water wells. However, private drinking water well owners are responsible for the quality of their own drinking water. Therefore, in order to protect our residents, the Environmental Health Program concentrates on educating it's residents about private drinking water wells and enforces all applicable state and local environmental health codes to keep those wells safe.
On this page you will find information related to private drinking water wells. The following information is listed: Types of well and their construction (directly below), testing, list of approved water laboratories, steps to protect your well, and Disinfecting your well.
Well Types
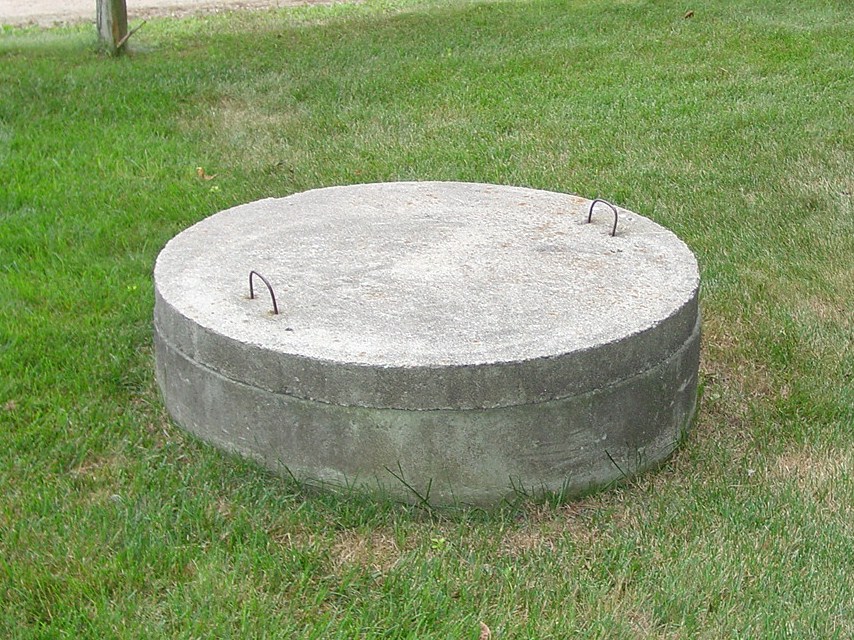 Dug Well - Dug wells are holes in the ground dug by shovel or backhoe. Historically, a dug well was excavated below the groundwater table until incoming water exceeded the digger’s bailing rate. The well was then lined (cased) with stones, brick, tile, or other material to prevent collapse. It was covered with a cap of wood, stone, or concrete.
Since it is so difficult to dig beneath the ground water table, dug wells are not very deep. Typically, they are only 10 to 30 feet deep. Being so shallow, dug wells have the highest risk of becoming contaminated. To minimize the likelihood of contamination, your dug well should have certain features. These features help to prevent contaminants from traveling along the outside of the casing or through the casing and into the well.
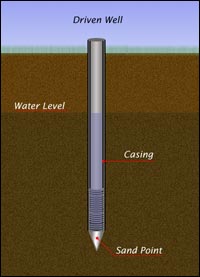 Driven Well - Like dug wells, driven wells pull water from the water-saturated zone above the bedrock. Driven wells can be deeper than dug wells. They are typically 30 to 50 feet deep and are usually located in areas with thick sand and gravel deposits where the ground water table is within 15 feet of the ground’s surface. In the proper geologic setting, driven wells can be easy and relatively inexpensive to install. Although deeper than dug wells, driven wells are still relatively shallow and have a moderate-to-high risk of contamination from nearby land activities.
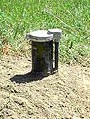 Drilled Well - Drilled wells penetrate about 100-400 feet into the bedrock. Where you find bedrock at the surface, it is commonly called ledge. To serve as a water supply, a drilled well must intersect bedrock fractures containing ground water. The casing of a drilled well is usually metal or plastic pipe, six inches in diameter that extends into the bedrock to prevent shallow ground water from entering the well. The casing also extends a foot or two above the ground’s surface. A sealant, such as cement grout or bentonite clay, is poured along the outside of the casing to the top of the well. The well is capped to prevent surface water from entering the well. Submersible pumps, located near the bottom of the well, are most commonly used in drilled wells. Wells with a shallow water table may feature a jet pump located inside the home. Most modern drilled wells incorporate a pitless adapter designed to provide a sanitary seal at the point where the discharge water line leaves the well to enter your home. The device attaches directly to the casing below the frost line and provides a watertight subsurface connection, protecting the well from frost and contamination. Older drilled wells may lack some of these sanitary features.
Periodic Water Testing
 If you have a private drinking water well, the most important thing you can do is to test your water regularly. Regular water quality testing is very important, there's a variety of contaminants that just cannot be identified by visual inspection, odor, or taste. This makes it very difficult for homeowners to know if the water quality of their well has changed. Testing is one way to ensure that your private drinking water supply is safe from harmful impurities. In addition, testing can determine whether other nuisance impurities, such as iron or manganese, exist.
We highly suggest that residents test their water semi-annually. Use the following testing frequencies as guidelines, but test more often if you suspect a problem or notice a sudden change in the quality of your drinking water.
- Twice each year, have your water tested for the following routine analysis: total coliform bacteria, nitrate, pH, sodium, turbidity, and color. All are good general indicators of water quality. You may want to test for additional nitrogen parameters (nitrate, nitrite, and ammonia). The pH of your well water will help you to determine the acidity of the water and whether you might have problems with pipe pitting and leaching of metals from the plumbing. The best times to test are usually after a spring or summer rainy period or after repair or replacement of your well, pumps, or water pipes.
- Whenever you notice a change in taste, color, odor, turbidity (as indicated by cloudiness), or sediments, or if you think your water quality has been affected, as indicated by unexplained household illness. Contact your local health department or DPH.
- If household plumbing contains lead pipes, fittings, or solder joints, test for pH, lead, copper, cadmium, and zinc. Also, brass contains 3% - 8% lead and may be found in your fixtures or well pump parts. Additionally, chrome fixtures contain brass. For homes with plumbing that has lead pipes, brass and/or chrome fixtures, testing for lead every 3-5 years would be a good idea.
- If there are children under 6 years old living in a house, test for lead. If there are children under 12 years of age, include a fluoride test.
- If you wish to monitor the efficiency and performance of home water treatment equipment: Test for the specific contaminant(s) being treated upon installation of a treatment device, and at regular intervals after installation. Comparing water tests of untreated and treated water will help you determine if the treatment system is doing its job. Twice each year, have your water tested for the following routine constituents: total coliform bacteria, nitrate, pH, sodium, turbidity, and color. All are good general indicators of water quality. You may want to test for additional nitrogen parameters (nitrate, nitrite, and ammonia). The pH of your well water will help you to determine the acidity of the water and whether you might have problems with pipe pitting and leaching of metals from the plumbing. The best times to test are usually after a spring or summer rainy period or after repair or replacement of your well, pumps, or water pipes.
Selecting a State-Certified Lab
So you're ready to test your water and need a lab. Ensure that the private lab is certified to test for the contaminants you are requesting. Ask the following questions:
- Do you accept samples to test individual homeowner well water?
- What type of screening packages do you offer?
- How much does it cost?
- Do I pick up the sample bottles or will you send them to me?
- How much time do I have to bring the sample back to the lab?
- How long will it take to get results?
Click here for a state list of approved laboratories
Disinfecting A Well
All new or repaired wells should be routinely disinfected prior to use. You should also disinfect following plumbing repairs or modifications. However, at some point or another, a well will need to be properly disinfected to ensure the bacteriological quality of the well is satisfactory.
When should you consider disinfecting your well?
- Whenever an unsatisfactory bacteriological result has been collected from your well or home.
- When the well cap has been taken off the well exposing the well casing interior.
- If the well is flooded over
- Routine maintenance of the well to reduce iron and manganese bacteria
In the case of a new well, try to coordinate between the well driller and pump installer and the contractor-plumber (if applicable). That way, the disinfection can be combined with pressure and leak tests of the entire water system, and the required bacteriological test for assuring safety of the drinking water supply can be performed at the same time. The chance of contamination is less likely to occur if there is no long delay between the time the well is drilled and the time the pump installer completes the connection from the well to the house plumbing along with the Connecticut Public Health Code (PHC) mandated, section 19-13-B51 k , disinfection requirement.
Prior to disinfection, it is expected that the entire well and piping system has been running clear and clean/purged of any sediment, foreign matter, or corrosion materials (due to incomplete development, unsanitary construction, or long idleness of the well). These substances react with the chlorine and decrease its effectiveness in destroying harmful bacteria and organic materials.
- Prepare a chlorine solution by mixing the required amount of chlorine to about 10 gallons of water. For effective disinfection, a minimum of 50 parts per million (ppm) chlorine dosage is specified. For a typical 6 inch well of about 100-300 foot depth, use approximately 4oz. of 70% available chlorine granules (HTH) or 1.0 quart of household 5.25% unscented bleach (Clorox). For exact amount of chlorine compound needed to develop the required 50-ppm dosage you can call our office at (860) 745-0383.
- If you have water treatment devices, remove all membranes, filters, cartridges, charcoal filters, etc. after the chlorination process is completed.
- Turn off; drain your storage tank and hot water tank, so that chlorinated water will also enter that tank.
- Pour the 10-gallon solution down the well casing. The chlorine batch should be poured into the well so that it swirls around the interior casing.
- Open every hot and cold-water faucet and tap in the plumbing system until the chlorine odor is noticed; then close the taps. If you do not detect a strong chlorine odor you may want to add more bleach and repeat
the process. During this time, it is important that all internal parts of the water system come in contact with this chlorinated water, including hot water tanks, if installed. If there are large non-pressure or pressure storage tanks (used in a community well supply) on the water system, they should be temporarily waterlogged to assure that all water-contact surfaces are chlorinated adequately. - With the use of a hose connected to a nearby sill cock, re-circulate some of the chlorinated water back down and along the interior of the well casing to dilute the initial concentrated solution. (The initial chlorine solution could attach concrete grout between the tile sections of a dug well).
- Replace the sanitary seal and cover the well casing so that the system cannot be subsequently contaminated.
- Allow the chlorinated water to stand idle in the well and piping system for at least six hours, preferably overnight.
- With the well pumping, flush the chlorinated water from the system through the storage tank and taps. An outside sill cock may be used to flush the water to waste, however, care should be taken to avoid contact of chlorinated water with the grass and shrubbery. (In a small well supply, it may take a few days to remove all the chlorine from the system). Do NOT over tax a low-yielding well. Open all faucets individually and run the water until there is no chlorine smell – may take 15 minutes or more.
- Backwash water softeners, sand filters and iron removal filters with chlorinated water.
- All water tanks should be flushed thoroughly so that any sediment will not interfere with the disinfection process
If you feel uncomfortable doing the disinfection process, contact a licensed plumber, pump installer or well driller.
Protecting your well
The following are steps you and your family can take to protect your private drinking water well:
- Know where your well is located
- Be sure that the well has a cap or sanitary seal to prevent unauthorized use of, or entry into, the well
- Periodically inspect exposed parts of the well for problems such as:
- cracked, corroded, or damaged well casing;
- broken or missing well cap;
- cracking of surface seal
- Slope the area around the well to drain surface runoff away from the well
- Do not cut off the well casing below the land surface
- Hire a certified well driller for any new well construction, modification, or abandonment
- Avoid mixing or using pesticides, fertilizers, herbicides, degreasers, fuels, and other pollutants near the well
- Do not dispose of wastes in dry wells or in abandoned wells
- Pump and inspect septic systems as often as recommended by your local health department
- Never dispose of hazardous materials in a septic system
- If you have a dug well, it is very important that the well is properly protected from surface water infiltration commonly associated with poor construction or disrepair and from the entry of insects and rodents